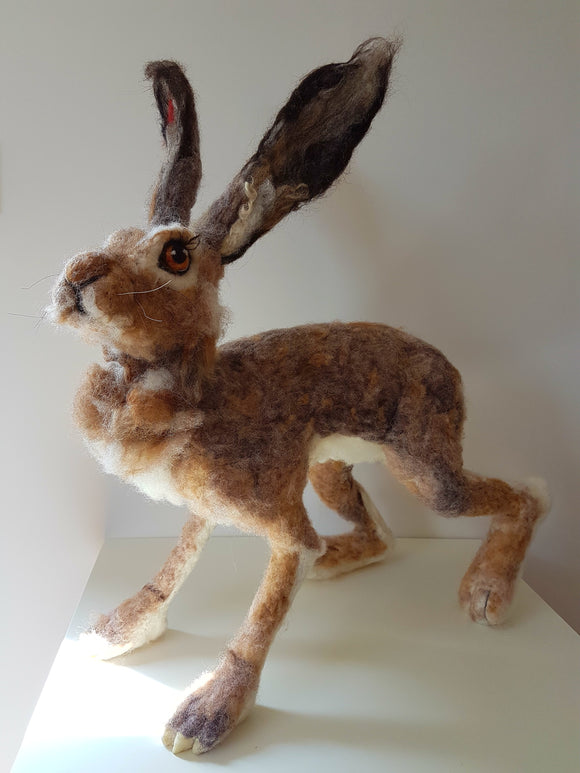
Running a Needle Felting Workshop Safely

Angela Park1 comment

When it comes to the art of felting, using needles is a common practice to create intricate designs and patterns. However, many may not realize the importance of using individual sets of felting needles for each client. Let's delve into the reasons behind this crucial practice.

Felting needles are essential tools for creating beautiful felted projects, but they also come with a risk of needle stick injuries. These injuries can be painful and potentially dangerous if not properly addressed. As a product expert in the crafting industry, it is important to understand the risks associated with felting needles and how to minimize the chances of injury.

What makes felting needles risky?

Felting needles are sharp, thin needles that are used to interlock fibers and create felted designs. Due to their design, they can easily penetrate the skin if not handled carefully. There is always a chance of a needle stick injury, even for the most skilled creator, this risk rises when participants are new to a craft.

How to reduce the risk of needle stick injuries?

There are several strategies that can help reduce the risk of needle stick injuries when working with felting needles:

1. Use a felting pad or foam block to provide a stable surface for felting. This can help prevent accidental slips that may result in injuries.

2. Always keep your fingers away from the needle tip when felting. It is important to maintain a safe distance between your hands and the needle to avoid accidental pricks.

3. Take breaks and rest your hands to prevent fatigue. Tired hands are more prone to accidents, so it is important to take regular breaks when working on felting projects.

4. Store felting needles in a secure container when not in use. This can help prevent accidental injuries when reaching for other tools in your crafting area.

What to do if you experience a needle stick injury?

If you do experience a needle stick injury while working with felting needles, it is important to wash the affected area with soap and water to prevent infection.

Safety should always be a top priority when working with sharp tools like felting needles.

What is the Risk of Blood Borne Contamination?


Sharing felting needles between clients poses a significant risk of blood borne contamination, which is why each client should always be given their own set of needles for their use only. Whilst fresh blood contamination would pose an immediate risk, did you know that dried blood can remain infectious for several days or even weeks. 


Even with at-home cleaning methods, such as disinfecting the needles, there is still a chance of residual blood particles remaining on the needles. This can lead to the transmission of serious infections, including hepatitis and other blood borne pathogens.

Why Can't At-Home Cleaning Methods Remove Contamination?

At-home cleaning methods, while well-intentioned, may not be sufficient to completely remove blood borne contamination from felting needles. The microscopic nature of blood particles makes it challenging to ensure thorough sterilization through simple cleaning techniques. As a result, the risk of infection transmission remains, even after cleaning.

  • Do not ever risk trying to clean felting needles at home !

How Can Individual Needle Sets Prevent Contamination?

Providing each client with their own set of felting needles is a simple yet effective way to prevent the risk of blood borne contamination. By using dedicated needle sets for each client, the chances of infection transmission are significantly reduced. This practice ensures the safety and well-being of both clients and the felting artist.

In conclusion, the importance of giving each client their own set of felting needles cannot be overstated. The risk of blood borne contamination, such as hepatitis, underscores the necessity of maintaining strict hygiene practices in the art of felting. By prioritising the safety and health of clients, felting artists can create a secure and trustworthy environment for their craft.


1. Plan Your Workshop Agenda

Start by outlining the goals of your workshop and creating a detailed agenda. Determine the projects you will be working on, the skills you will be teaching, and the materials needed for each participant.

2. Gather High-Quality Supplies

Invest in quality easy to felt wool such as carded Corriedale or Perendale, felting needles for each attendee, foam or eco pads, and any other essential supplies you might need with your specific project. Providing participants with the best materials will ensure they have a positive experience and create beautiful felted creations.

3. Create a Welcoming Environment

Set up a well-lit and organized workspace for your workshop. Make sure each participant has enough room to work comfortably and access to all the necessary tools and materials.

4. Offer Guidance and Support

As the workshop leader, be prepared to offer guidance and support to participants of all skill levels. Demonstrate felting techniques, provide individualized feedback, and encourage creativity and experimentation.

5. Encourage Collaboration and Sharing

Foster a sense of community among workshop participants by encouraging collaboration and sharing. Create opportunities for attendees to learn from each other, exchange ideas, and showcase their work.

6. Provide Clear Instructions

Ensure that your instructions are clear, concise, and easy to follow. Break down each step of the felting process and provide visual aids or demonstrations to help participants understand the techniques.

7. Allow Time for Practice and Exploration

Allocate time during the workshop for participants to practice their skills and experiment with different felting techniques. Encourage them to step out of their comfort zones and try new approaches to needle felting.

8. Offer Refreshments and Breaks

Keep participants energized and engaged by providing refreshments and scheduled breaks throughout the workshop. A well-fed and hydrated group is more likely to stay focused and productive.

9. Collect Feedback and Follow Up

After the workshop, collect feedback from participants to learn what worked well and what could be improved. Use this feedback to make adjustments for future workshops and follow up with attendees to thank them for their participation.

By following these expert tips, you can run a successful needle felting workshop that inspires creativity, fosters community, and provides a memorable experience for all participants.


Comments (1)

Jill Holmes

Thank you well written x

Leave a comment

Please note, comments must be approved before they are published